Accelent is a complete accounting and inventory management system designed for small and medium businesses — shops, distributors, wholesalers, and service providers. It runs on a Windows PC and pairs with an Android mobile app so you can check your business from anywhere.
🖥️ Desktop App
Full-featured accounting, invoicing, inventory, GST returns, payroll, and reporting. Everything runs on your Windows PC. No internet required for daily use.
📱 Mobile App
View live sales, inventory, and balances from your phone. Create invoices and purchases remotely. Connects to the desktop over your local WiFi or from anywhere via Tailscale.
📊 What it manages
Sales invoices · Purchase bills · Inventory & stock · Parties (customers & vendors) · Bank & cash accounts · Employees & payroll · GST & e-invoicing (India), plus tax for Pakistan, Sri Lanka and Simple VAT countries
🔒 Your data stays yours
All data is stored locally on your PC in a single database file. Nothing is sent to any cloud server. You own it completely.
Chapter 2 — Accounting Basics
2. Accounting Basics for New Users
If you are new to accounting software, read this section first. You do not need a degree in accounting — just an understanding of a few key concepts.
💰 Cash vs Bank
Your business has money in two places: cash in hand (physical notes in your drawer) and bank accounts (money in your bank). Accelent tracks both separately. When you receive cash, the cash balance goes up. When you deposit into a bank, cash goes down and bank goes up.
🧾 Invoice (Sales Bill)
An invoice is a bill you give to a customer when they buy from you. It lists the items, quantities, prices, and total amount. In Accelent, every invoice is recorded and linked to the customer's account automatically.
🛒 Purchase Bill
A purchase bill is the bill you receive from a supplier when you buy goods. Recording it in Accelent automatically increases your inventory stock and records the amount owed to that supplier.
👥 Parties (Customers & Vendors)
A Party is anyone you do regular business with. Customers owe you money (receivable — shown in green). Vendors/suppliers are people you owe money to (payable — shown in red). Accelent tracks each party's balance automatically from all transactions.
📦 Inventory / Stock
Inventory is the list of items/products you sell. For each item, Accelent tracks the quantity in stock, selling price, purchase price, and minimum stock level (when it should alert you to reorder).
⚖️ Opening Balance
When you start using Accelent for the first time, you need to tell the system what you already have — how much cash, how much in each bank account, and how much each customer owes you or you owe each vendor. These are called Opening Balances and are entered once during initial setup.
🧮 Debit / Credit (Simplified)
You do not need to worry about debit/credit entries in Accelent — the software handles it automatically. When you record a sale, it adds to your income and the customer's balance. When you record a purchase, it adds to your stock and vendor balance. Just record what happened — Accelent handles the accounting.
📅 Financial Year
In India, the financial year runs from 1 April to 31 March of the next year. GST returns, balance sheets, and profit & loss are calculated within this period. Accelent's Finalization panel helps you close a financial year cleanly.
💡 Golden Rule: Record every sale, every purchase, and every expense the same day it happens. The more regular you are, the more accurate your reports and balances will be.
Chapter 3 — Installation
3. Installing the Desktop App
What You Need
Windows 10 or Windows 11 (64-bit)
RAM: 8 GB recommended for the quickest bill scanning. 4 GB is the minimum — everything works, but bill scans take longer.
About 1 GB of free disk space
The installer: Accelent_Setup_v2.3.7.exe, downloaded from accelentapp.com
Installing with the Installer (Recommended)
1
Download Accelent_Setup_v2.3.7.exe from accelentapp.com → Download for Windows.
2
Double-click it. If Windows shows a SmartScreen warning, click "More info" then "Run anyway".
3
Follow the steps and click Install. The installer also sets up the Windows components that bill scanning needs.
4
Open Accelent from the Start menu or the desktop shortcut.
Portable Zip (Alternative)
If you prefer not to install, download Accelent_Desktop_v2.3.7.zip instead and follow these steps:
Installation Steps
1
Right-click Accelent_Desktop_v2.3.7.zip → Extract All. Choose a permanent location such as C:\Accelent or D:\Accelent. Do not run from inside the zip.
2
Open the extracted Accelent folder. You will see Accelent.exe, setup.bat, and several support folders.
3
Double-click Accelent.exe. Windows may show a SmartScreen warning — click "More info" then "Run anyway". This happens because the app is not yet digitally signed.
4
The app opens. On first launch, it creates your database file automatically at C:\Users\[YourName]\AppData\Roaming\BrandAccShay\
5
Right-click Accelent.exe → Send to → Desktop (create shortcut) for easy daily access.
First-Time Firewall Setup (for Mobile App)
Run this once if you will use the mobile companion app:
1
In the Accelent folder, double-click setup.bat.
2
Windows asks for Administrator permission — click Yes.
3
The script opens port 8765 in the Windows Firewall and shows your PC's IP address. Note the IP — you may need it for manual phone connection.
⚠ If you skip setup.bat, the mobile app will not be able to connect to the desktop.
Chapter 4 — First-Time Company Setup
4. First-Time Company Setup
When you first open Accelent, spend 10 minutes entering your company details before recording any transactions.
Before You Begin — Choose Your Country
The very first time Accelent starts (right after you set your own password), it asks for your country. The country decides your tax rules and currency — GST for India, VAT for the other countries — so every invoice, report and tax return uses the right rates from day one.
1
In the Welcome — Set Up Your Country window, pick your Country.
2
Answer the extra question for your country, if one appears (see the table below).
3
Check the Language. It is pre-filled with your country's main language (for example Hindi for India) — change it to English or any other language you prefer.
4
Click Confirm and Continue.
Country
Tax
Currency
Extra question
India
GST (CGST + SGST / IGST)
₹ INR
—
Pakistan
Federal sales tax on goods, provincial tax on services
Rs. PKR
Province — your business's home province (ICT, Punjab, Sindh, KPK, Balochistan, AJ & Kashmir, Gilgit-Baltistan)
Sri Lanka
VAT 18%, plus SSCL where it applies
Rs. LKR
Tick Financial Institution (VAT 20.5% on financial items) and/or SSCL-liable (annual turnover above LKR 120,000,000) if they apply to you
Nepal
VAT 13%
Rs. NPR
—
Bangladesh
VAT 15%
৳ BDT
—
Bhutan
Sales tax 7%
Nu. BTN
—
Maldives
GST 8% (17% for tourism sales, chosen per invoice)
Rf. MVR
—
🚨 Choose carefully — the country cannot be changed later. Once you save your first sale, purchase or inventory item, the country is locked: changing it would leave your saved amounts in the old currency and tax rules. The only way to choose again is Settings → App Settings → Reset Database, which erases all data. Language, on the other hand, can be changed at any time (Chapter 6).
💡 Your country is always shown at the bottom-left of the window, in the status bar — for example India · GST. If your country is not in the list, contact support before you start.
Step 1 — Enter Company Information
1
Go to Settings (⚙️ in the sidebar) → click the 🏢 Company tab.
2
Fill in your company name, address, phone number, email, GST number (GSTIN), and PAN number.
3
Upload your company logo — it will appear on all printed invoices.
4
Click Save Company Settings.
Step 2 — Set Opening Balances
Opening balances tell the software what you already had on Day 1. Enter these once and do not change them later.
1
Go to Settings → 📊 Balances tab.
2
Click Edit Cash Balance — enter your physical cash on hand as of your start date.
3
Click Edit Bank Balances — enter the closing balance of each bank account from your last bank statement.
4
Click Edit Party Balances — enter how much each customer owes you and how much you owe each supplier as of your start date.
Step 3 — Add Your Inventory
1
Go to the Inventory panel → click + Add Item.
2
For each product: enter name, category, unit (Pcs/Kg/Box etc.), purchase price, selling price, current stock quantity, and minimum stock level.
3
Repeat for all products. You can add more items anytime.
💡 Tip: Set a minimum stock level for fast-moving items. Accelent marks them 🟡 Low or 🔴 Out when stock falls below that level.
Step 4 — Check the Language
You chose a language together with your country. To change it, go to Settings → ⚙️ App Settings → Language. The interface updates immediately — see Chapter 6 for all 18 languages.
Chapter 5 — Migrating from Another Software
5. Migrating from Another Accounting Software
If you are switching from Tally, Busy, Marg, Vyapar, or any other software, follow these steps. The key idea: you only need closing balances from the old software — not individual transactions.
⚠ Pick a migration date — typically the last day of a month or the last day of your financial year. Write down all balances from the old software as of that date. Then start fresh in Accelent from the next day.
What to Collect from Your Old Software
What You Need
Where to Find It
What to Do in Accelent
Cash in hand (closing balance)
Cash ledger → closing balance
Settings → Balances → Edit Cash
Bank balances (each account)
Bank ledger or bank statement
Settings → Balances → Edit Bank
Customer outstanding amounts
Debtors / Sundry Debtors list
Settings → Balances → Edit Party Balances
Supplier outstanding amounts
Creditors / Sundry Creditors list
Settings → Balances → Edit Party Balances
Inventory items & stock
Stock summary / item list
Inventory panel → Add each item with opening qty
Employee details
Employee master / HR module
Employees panel → Add each employee
Migration Steps
1
Choose your cut-off date. Example: "I will migrate as of 31 March 2026 — my Accelent starts from 1 April 2026."
2
Print or export the balances from your old software as of the cut-off date: cash balance, bank balances, outstanding customer amounts, outstanding vendor amounts, and stock list with quantities.
3
Set up Accelent — company info (Chapter 4).
4
Enter opening balances — cash, bank, party balances from the old software as of cut-off date (Settings → Balances).
5
Add your inventory items with the stock quantities as of cut-off date.
6
Start recording new transactions in Accelent from the day after cut-off.
7
Cross-check after one week: Go to Accounts and verify that cash and bank balances match what you physically have. If they differ, use Settings → Recalculate to refresh all balances.
Migrating from Tally
In Tally, go to Gateway → Display → Account Books → Ledger for each party and note the closing balance.
For stock: Gateway → Display → Inventory Books → Stock Summary — note qty and rate for each item.
Enter all of the above into Accelent as opening balances (Chapter 4, Steps 2 and 3).
💡 Keep your old software accessible for at least 2–3 months after migration. You may need to look up historical transactions for reference. You do NOT need to enter those old transactions into Accelent.
✅ Your historical data is safe in the old software. Accelent only needs the balances — the starting point. All future transactions go in Accelent.
Chapter 6 — Language & Theme
6. Language & Theme
Changing the Language
Accelent supports 18 languages: English, Hindi (हिंदी), Urdu (اردو), Spanish, French, German, Bengali (বাংলা), Tamil (தமிழ்), Telugu (తెలుగు), Kannada (ಕನ್ನಡ), Gujarati (ગુજરાતી), Marathi (मराठी), Punjabi (ਪੰਜਾਬੀ), Nepali (नेपाली), Sinhala (සිංහල), Pashto (پښتو), Dhivehi (ދިވެހި), and Dzongkha (རྫོང་ཁ).
1
Go to Settings → ⚙️ App Settings.
2
Find the Language dropdown and select your language — each one is shown in its own script (e.g. "ਪੰਜਾਬੀ", "தமிழ்"), so you don't need to already know English or any code to find yours.
3
The interface — all tooltips, tab labels, and navigation hints — updates immediately. No restart needed.
💡 Translations for languages added after English/Hindi/Urdu/Spanish/French/German are machine-assisted. If you spot a tooltip that reads oddly in your language, let us know via Settings → Support so we can correct it.
Changing the Theme
Go to Settings → ⚙️ App Settings → select a colour theme (Light, Dark, or others). The theme changes immediately across all panels.
💡 The selected language and theme are saved automatically. They remain the same the next time you open the app.
Chapter 7 — Dashboard
7. Dashboard
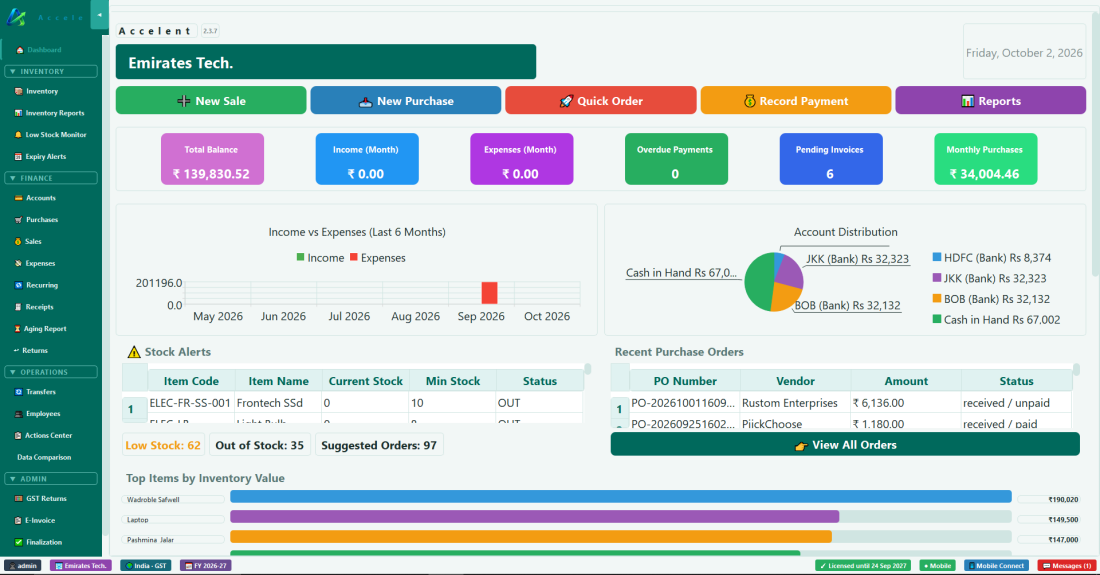
The Dashboard is your business at a glance. It refreshes every time you navigate to it.
The Dashboard — quick-action buttons, this month's figures, charts, stock alerts and recent purchase orders.
Section
What It Shows
Quick buttons
New Sale, New Purchase, Quick Order, Record Payment and Reports — one click to the most common jobs
Total Balance
All your cash and bank money together
Income / Expenses (Month)
Money earned and spent so far this month
Overdue Payments · Pending Invoices
Customers who still owe you
Monthly Purchases
What you have bought this month
Income vs Expenses · Account Distribution
The last 6 months as a chart, and where your money sits (cash and each bank)
Stock Alerts
Items that are low or out of stock, with the Low Stock / Out of Stock / Suggested Orders counts
Recent Purchase Orders
Your latest orders and whether they are received and paid — View All Orders opens the full list
Top Items by Inventory Value
The items holding most of your stock money
💡 The Dashboard does not auto-refresh in real time — click on another panel and come back to see updated figures.
Chapter 8 — Inventory
8. Inventory Panel
Inventory keeps track of every product you sell — stock levels, prices, categories, and expiry dates.
Adding a New Item
1
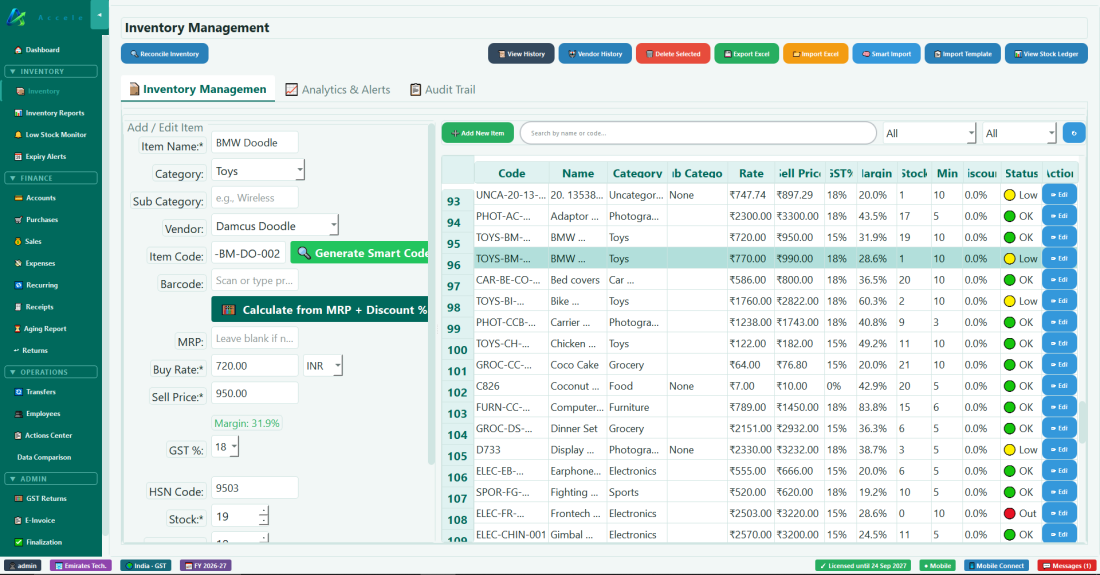
Click ➕ Add New Item above the item list, and fill in the Add / Edit Item form on the left.
2
Fill in: Item Name, Category, Vendor, Buy Rate (what you paid), Sell Price (what you charge — the Margin is shown below it), GST %, Stock (how many you have right now) and the minimum stock level (alert threshold). Click 🔍 Generate Smart Code for an item code.
3
Optionally add: Sub Category, Barcode, MRP (use Calculate from MRP + Discount % to work out the price), HSN Code (for GST), Expiry Date (for perishables).
4
Click Save.
Stock Color Indicators
Color
Meaning
🟢 OK
Stock is healthy
🟡 Low
Stock is below minimum level — consider reordering
🔴 Out
Out of stock — 0 quantity remaining
Inventory Management — the Add / Edit Item form on the left, every item with its Status on the right.
Inventory Reports
The Inventory Reports panel (separate from main Inventory) gives you stock valuation reports, movement history, and category-wise summaries. Use it for monthly stock audits.
Audit Trail
The Audit Trail tab (inside Inventory Management) lists every stock change — sales, purchases, adjustments, returns, and imports — with a Value column and a running Total value for whatever you've filtered. Filter Reason = "import" to see exactly how much stock value a bulk import brought into the business. Use 🖨️ Print Report to print the current filtered list. This tab is read-only — to correct or delete an item's stock, go to the Inventory Management tab instead.
Expiry Alerts
The Expiry Alerts panel lists items approaching their expiry date. Items are highlighted in orange (expiring soon) or red (expired). Right-click any row for Set Expiry or Print Report. Use this to remove expired stock before selling.
⚠ Stock levels update automatically when you record a sale (stock goes down) or a purchase (stock goes up). Never manually add or subtract stock except for physical stock audits.
Chapter 8b — Low Stock Monitor
8b. Low Stock Monitor
Low Stock Monitor lists every item at or below its Minimum Stock Level and gives you two ways to reorder: a quick wizard for registering a brand-new item and vendor together, and a fuller "Order from Vendor" screen for building a proper Purchase Order. Unlike Purchase Panel's New Purchase, orders created here are drafts — they don't touch stock or vendor balances until you send them and record the goods received.
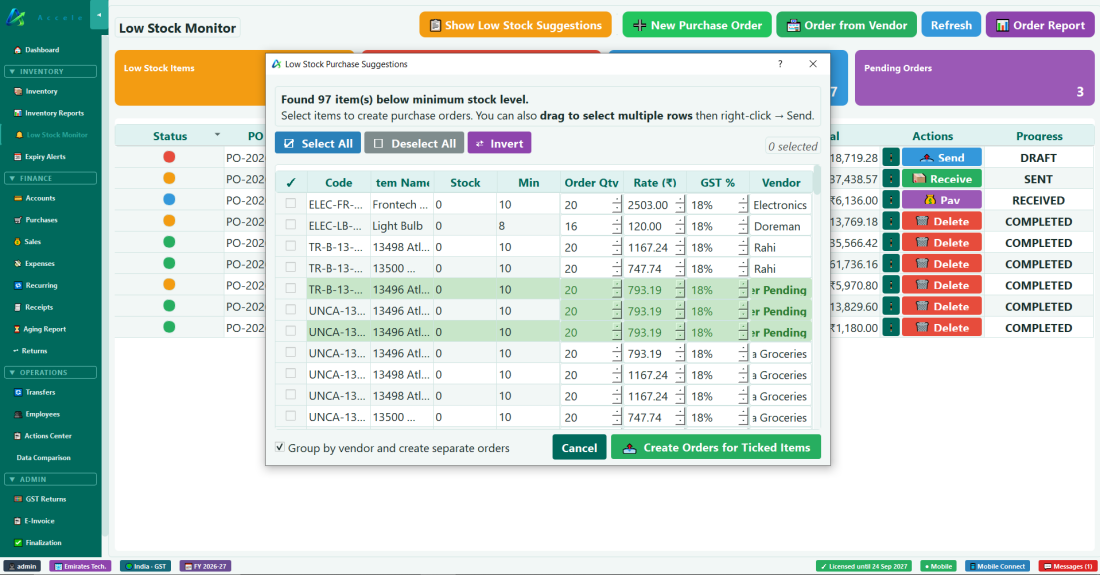
📋 Show Low Stock Suggestions
The quickest way to reorder everything that is running low at once.
1
Click Show Low Stock Suggestions. The list shows every item below its minimum stock, with a suggested Order Qty, Rate, GST % and Vendor.
2
Tick the items to order (or use Select All / Invert) and adjust any Order Qty.
3
Keep Group by vendor and create separate orders ticked to get one order per vendor, then click Create Orders for Ticked Items. The new orders appear in the list behind as drafts.
Low Stock Purchase Suggestions — tick the items, then create one order per vendor.
⚡ Quick New Order
Use this when you're registering a genuinely new product from a genuinely new vendor in one go — item details and vendor details side by side, ending in a draft Purchase Order.
1
Click ⚡ Quick New Order.
2
1️⃣ Add / Edit Item — Vendor (type the new vendor's name), Item Name, Category, then click 🔍 Generate for a Code. Fill in Buy Rate, Sell Price, GST%, HSN, Stock, Min Stock. Scan the product's barcode with 📱 Scan with Phone, or leave it blank and add one later. Click 💾 Save Item to Inventory.
3
2️⃣ Vendor Details & Link — fill in the vendor's phone, address, TIN/GSTIN, and email, then save to link them and create a draft PO row.
4
Adjust the Order Qty in the preview row if needed — the total recalculates with GST.
5
Click 📤 Send Purchase Order. The PO is marked SENT and appears in Existing Purchase Orders below.
Order from Vendor
Use this for a normal reorder from a vendor you already buy from — it works almost identically to Purchase Panel's New Purchase screen (same vendor-first auto-fill, scan-to-add, and per-row barcode ✓/+📷/🗑 indicators — see Chapter 10 for the full barcode walkthrough), with one key difference: saving here creates a draft Purchase Order, not an immediate purchase. Nothing is added to stock or the vendor's balance until the order is sent and later received.
1
Pick the vendor — their usual items auto-fill into the Order Items table, checkbox on by default.
2
Uncheck anything you don't want to order this time, adjust quantities, or scan/add new items exactly as in Purchase Panel.
3
Click OK to save the draft, then send it from Existing Purchase Orders when ready.
Existing Purchase Orders
Opens a list of every Purchase Order you've created (from either method above), with a colored status dot: grey = draft, orange = sent, blue = received, green = completed (received & fully paid). From here you can send a draft order, record payment against a sent/received order, and mark goods as received. Right-click a row to 🗑️ Delete a draft/cancelled/completed order or ❌ Cancel one that's already been sent.
✅ When you're ready to record the goods, go to Purchase Panel → 📋 Load from PO and pick the order — it loads the vendor and items into a normal New Purchase form for you to review before saving. That save is the step that finally updates stock and the vendor's payable balance, so a PO by itself never affects them.
💡 Choose Quick New Order only for a brand-new item + brand-new vendor together. For anything else — a new item from an existing vendor, an existing item from a new vendor, or a routine reorder — use Order from Vendor instead.
Chapter 9 — Sales
9. Sales Panel
The Sales panel is where you create customer invoices. Every sale is recorded here.
Creating a New Invoice
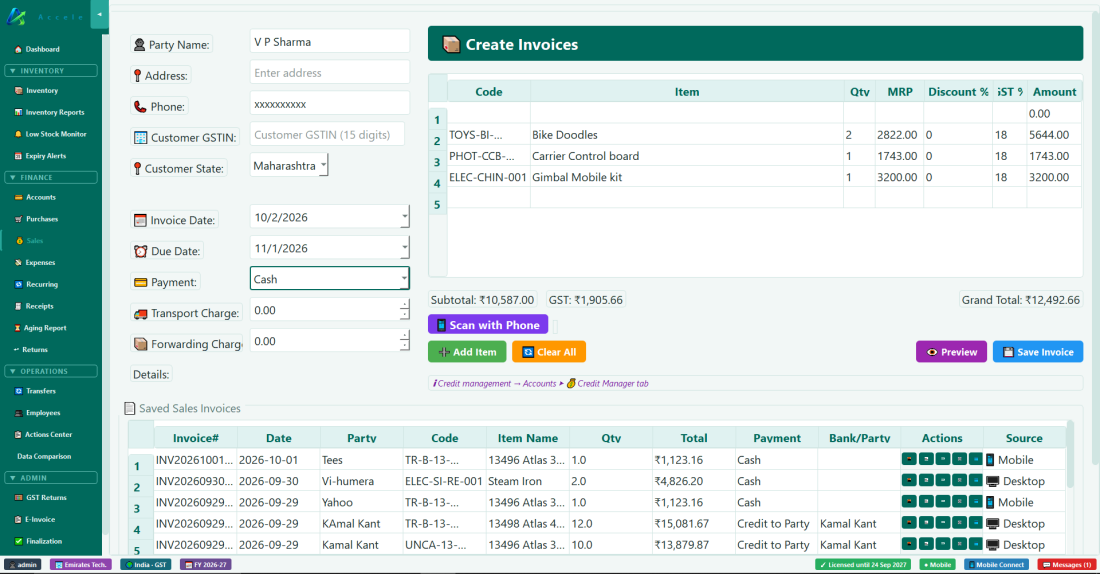
1
The left side of the Sales panel is the Invoice Form. Enter the customer's name — if they are a known party, their balance will appear.
2
Select the payment method: Cash, Bank, UPI, or Credit (on account).
3
Click 📱 Scan with Phone to scan a product barcode with the phone camera, or click ➕ Add Item to search and select products from your inventory.
4
Adjust quantities. The total updates automatically.
5
Optionally enter a discount amount or additional charges (P&F).
6
Click 💾 Save Invoice. The invoice is saved, stock is reduced, and the customer's balance is updated.
7
Click 🖨 Print to print the invoice. Click 📱 WhatsApp to share it via WhatsApp.
Creating an invoice — customer details on the left, items and totals on the right, saved invoices below.
Viewing Past Invoices
The Saved Sales Invoices list below the form shows all saved invoices; the Source column shows whether each was made on the desktop or the phone. You can search by customer name, invoice number, or date range. Each invoice row has buttons to View, Edit, Print, or Delete.
Sales Returns
If a customer returns goods, go to the Returns panel → Sales Returns tab. Select the original invoice, enter the returned items, and save. Stock is restored and a credit note is issued. If the original sale was Cash/Bank/UPI/Card, the refund reduces that Cash/Bank balance directly; if it was a Credit sale, the refund instead reduces what the customer owes you.
💡 Credit sales: When you select "Credit" as payment, the invoice is marked as Unpaid and the amount is added to the customer's receivable balance. When they pay later, record it as a Receipt in the Receipts panel.
Chapter 10 — Purchases
10. Purchases Panel
Record every purchase bill from suppliers here. Stock increases and the vendor's payable balance is tracked automatically.
Recording a Purchase
1
Click + New Purchase.
2
Pick or type the Vendor Name first — everything below it responds to this. For an existing vendor, address/phone/GSTIN fill in automatically and their usual items load straight into the Order Items table, each pre-checked and ready to go.
3
Uncheck any row (☑) you don't want included in this bill. Adjust Qty/Rate/GST% per row as needed — the Amount and the Subtotal/GST/Grand Total at the bottom update live.
4
Add anything not already in the table by scanning it (📷 field + 📱 Scan with Phone at the top of Order Items), or register a brand-new product via ➕ Add Item to Same Vendor below the table.
5
Fill in Bill Number, Bill Date, and Payment Method (Cash / Bank Transfer / Cheque / Card / UPI / Credit to Vendor) in Bill Details.
6
Click 💾 Save Purchase. Stock and the vendor's balance update immediately.
Vendor & Item Combinations
The Order Items table and ➕ Add Item to Same Vendor panel adapt to four situations depending on whether the vendor and the item you're buying already exist in Accelent. The Vendor Name field always drives what you see below it, so pick or type the vendor first.
1. Existing Vendor + Existing Item
1
Start typing the vendor's name in Vendor Name and select them from the dropdown. Their address, phone, and GSTIN fill in automatically.
2
The Order Items table auto-fills with everything you've bought from this vendor before, each row already checked. Uncheck anything you're not buying this time — there's no delete button by design, so nothing in the table can be removed from inventory by accident.
3
Update the Qty for anything you are buying, then save.
2. Existing Vendor + New Item
1
Select the existing vendor as above.
2
In ➕ Add Item to Same Vendor, fill in Name, Category, Buy Rate, GST%, Sell Price, and Qty. Click 🔍 Generate next to Code for an automatic item code, or type your own.
3
Click ✅ Add Item to Purchase. The item is created, linked to this vendor, and added to the Order Items table.
3. New Vendor + New Item
1
Type a vendor name that doesn't already exist. Address/phone/GSTIN will be empty — fill them in if you have them (optional).
2
Since there's no history for this vendor yet, the Order Items table starts empty — that's expected, not an error.
3
Use ➕ Add Item to Same Vendor exactly as in case 2. Accelent creates both the new vendor and the new item the moment you save the purchase.
4. New Vendor + Existing Item
This is buying a product you already stock from a supplier you haven't bought it from before — for example, your usual vendor is out of stock and you're trying someone new for the same item.
1
Type the new vendor's name (the Order Items table stays empty — normal for a first purchase).
2
Scan the item's barcode, or type its exact barcode/item code into the scan field and press Enter. There's currently no name-search for this specific case — an existing item can only be pulled in here by its code/barcode.
3
Save the purchase. The item's own details don't change — Accelent just records that you can also buy it from this vendor, at this rate.
✅ Buying the same item from a second or third vendor never overwrites or breaks its existing details. Accelent keeps a separate price/date record per vendor for every item, so trying a new supplier for one purchase never affects your other vendor relationships.
Barcode Scanning & Status
Scan with 📱 Scan with Phone (or type into the barcode field and press Enter) at the top of Order Items to add an item straight into the purchase.
1
If the barcode matches an item already in inventory, it's added to the table — or, if it's already in this bill, its Qty increases by 1 with a confirmation message so you always know what just happened.
2
If it doesn't match anything, Accelent tells you so and points you to ➕ Add Item to Same Vendor below to register it as a new product.
Every row in the Order Items table also shows its own barcode status, in the 🔖 column:
✓
✓ Barcode (green) — this item already has a barcode saved. Click it to remove that barcode, e.g. if a scan attached the wrong code.
+
+📷 (blue) — no barcode yet. Click it to scan and attach one with your phone.
🗑
🗑 Clear Barcode — a dedicated reset button for a barcode that got attached but didn't take properly, so you can scan it fresh. Only enabled once the item has a barcode to clear.
💡 ➕ Add Item to Same Vendor always links the new item to whichever vendor is currently in Vendor Name — new or existing — so double-check the vendor field before registering a new item, especially when scanning several products from the same delivery in a row.
📷 Scan Vendor Bill — read a whole paper bill automatically
Instead of typing every line from a supplier's bill by hand, photograph it and let Accelent read the line items, HSN codes, and GST straight off the photo. This runs entirely on your own computer — no internet connection is used, and the photo is never sent anywhere.
1
Pick or type the Vendor Name first, then click 📷 Scan Vendor Bill. Choose the bill photo — a clear, well-lit shot works best.
2
Before scanning starts, straighten the photo if needed using Rotate Left / Rotate Right — an upright photo scans in a few seconds, a sideways one takes longer while it works out the orientation on its own. Click ▶ Start Scan when it looks right.
3
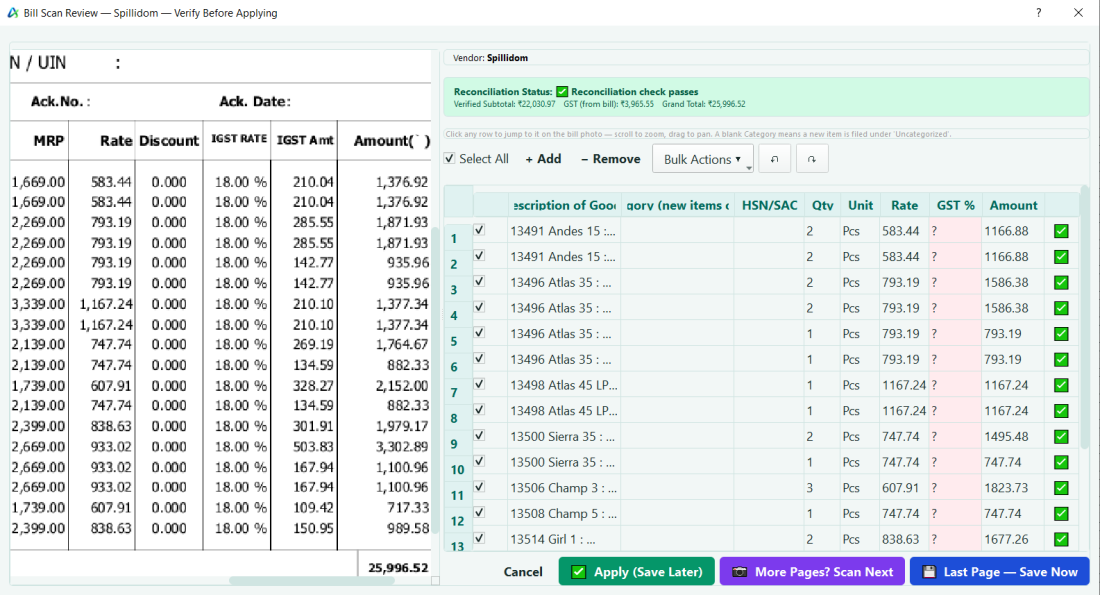
The review screen opens with the bill photo on one side and an editable grid of everything found on the other. Check the Reconciliation Status banner at the top — it tells you whether the line items add up to the bill's own printed total.
4
Click any row to jump straight to where it came from on the bill photo. Fix anything that reads incorrectly — Description, Category, HSN/SAC, Qty, Unit, Rate, and GST% are all editable. A row Accelent couldn't confidently read shows ⚠️; type in what's missing and it updates to ✅. Uncheck any row you don't want to include.
5
Use Bulk Actions to auto-match several rows to your existing catalog at once, or map them to a category — anything only moderately confident opens a confirmation popup so nothing gets matched to the wrong product silently.
6
Choose how to finish: • 💾 Last Page — Save Now — saves the purchase straight away (use it on a one-page bill, or on the last page). A confirmation box shows the exact Vendor, Goods Amount, GST, and Grand Total — check it matches the bill, then confirm. • 📷 More Pages? Scan Next — for a bill printed on more than one page: adds this page's items and opens the photo picker for the next page. On the last page, use Last Page — Save Now; all pages are saved together as one purchase. • ✅ Apply (Save Later) — adds the items to the New Purchase form without saving, so you can review them there and click Save Purchase yourself.
Bill Scan Review — the bill photo on the left, the items found on the right, and the Reconciliation Status at the top.
✅ Made a mistake in the grid? Ctrl+Z undoes the last edit, add, remove, or bulk action — nothing you do here is permanent until you actually save. And if you get interrupted partway through (the app closes, your computer sleeps), picking the same photo again offers to resume exactly where you left off instead of starting over.
💡 This works for a brand-new vendor with no purchase history too — every line on the bill just becomes a new item, created the same way as adding one by hand. Scan Vendor Bill needs local AI components that aren't included in every install; if it reports being unavailable, everything else in Accelent is unaffected.
💡 Speed: on a PC with 8 GB RAM a scan finishes quickly; with 4 GB it still works but takes longer — let it run. Free trial: 15 bill scans are included; after that, scanning needs an activated license (everything else keeps working for the rest of the trial). With a subscription, scanning is unlimited.
Purchase Returns
Go to Returns panel → Purchase Returns tab to record goods returned to a supplier. A debit note is created and stock is reduced. The return amount is also netted out of your Purchases figure in the Profit & Loss, Trading Account, and Balance Sheet reports.
💡 Always enter the supplier's bill number when recording a purchase — it makes it easy to find specific purchases and is required for GST reconciliation.
Chapter 11 — Expenses & Receipts
11. Expenses & Receipts
Expenses Panel
Record all business expenses here: rent, electricity, salary advance, transport, office supplies, etc.
1
Click + Add Expense.
2
Select Category (Rent / Electricity / Salary / Transport / Other), enter Amount, payment method (Cash or Bank), and a short description.
3
Click Save. The cash or bank balance is reduced accordingly.
Recurring Expenses
For expenses that repeat on a schedule (monthly rent, utility bills), use the Recurring Expenses panel:
1
Go to Recurring Expenses → click + New Template.
2
Set the expense name, amount, category, and recurrence schedule (monthly, weekly, etc.).
3
Accelent will remind you when due and can post the expense automatically.
Receipts Panel
The Receipts panel is a ledger of all money received and paid — cash collected, payments to vendors, bank transfers, and salary payments. It is automatically populated from sales, purchases, and expenses. You can also record a standalone receipt here (e.g., when a credit customer pays their outstanding balance).
💡 When a credit customer pays you, go to Receipts → + New Receipt, select the customer, and enter the amount received. Their outstanding balance will reduce automatically.
Chapter 12 — Accounts & Transfers
12. Accounts & Transfers
Accounts Panel
Shows all your money accounts — Cash, and every Bank account. For each account you can see:
Current balance (always live)
Full transaction history with dates and descriptions
Debit (money in) and credit (money out) columns
Adding a Bank Account
1
Go to Accounts → under Bank Accounts, click ➕ Add New Bank.
2
Enter bank name, account number, and opening balance (from your bank statement on your start date).
3
Click Save. The bank account now appears in all payment dropdowns (Sales, Purchases, Expenses).
Transfers Panel
Use the Transfers panel when you move money between your own accounts — for example, depositing cash into your bank account, or transferring between two bank accounts.
1
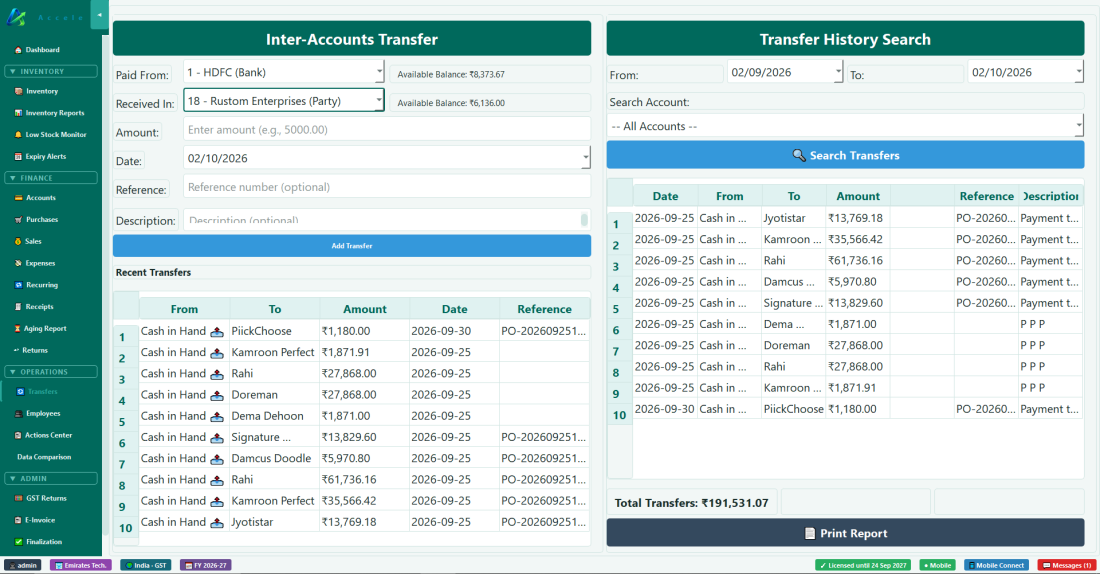
Go to Transfers. In Inter-Accounts Transfer, choose Paid From (e.g., Cash in Hand) and Received In (e.g., HDFC Bank) — the available balance of each is shown beside it.
2
Enter the Amount and Date, and optionally a Reference and Description.
3
Click Add Transfer. Cash decreases, bank increases — both balances update. It appears under Recent Transfers.
Transfers — the transfer form on the left, Transfer History Search on the right.
Use Transfer History Search on the right to find past transfers by date and account, and Print Report to print them.
⚠ Never record a bank deposit as an "income" or "receipt" — always use the Transfers panel. Recording it elsewhere will inflate your income figures.
Chapter 13 — Reports & Aging
13. Reports, Data Comparison & Aging Report
Data Comparison (Reports) Panel
Generates financial summaries and comparisons:
Monthly Sales vs Purchases — bar chart and table showing each month's totals
Net Profit — Sales minus Purchases and Expenses
Party Statement — full transaction history between you and any party
Account Statement — all transactions for a specific cash or bank account
Use the Export (Ctrl+E) button to save the report as a file, or Print (Ctrl+P) to print directly.
Aging Report Panel
The Aging Report shows how long your customers' outstanding invoices have been unpaid, and how long your supplier bills have been due.
Aging Bucket
Meaning
0–30 days
Recent — normal credit period
31–60 days
Getting old — follow up recommended
61–90 days
Overdue — contact the party
90+ days
Very overdue — escalate or write off
Use this report to identify which customers need follow-up calls and which vendor bills need urgent payment.
Finalization Panel
At the end of the financial year, go to Finalization to generate your Profit & Loss Statement and Balance Sheet. These reports can be printed or exported for your accountant or auditor.
Finalization also closes the financial year. To look at an earlier year, switch the financial year from the status bar at the bottom of the window.
Chapter 14 — Employees & Payroll
14. Employees & Payroll
Adding an Employee
1
Go to Employees panel → click + Add Employee.
2
Enter: Full Name, Designation, Mobile Number, Basic Salary (monthly), and Overtime Multiplier (e.g. 1.5 for time-and-a-half).
3
Click Save.
Recording Salary Payments
1
In the Employees panel, select the employee and click Pay Salary.
2
Confirm the month, base salary, any overtime, and deductions.
3
Select payment method (Cash or Bank) and click Confirm Payment. The cash/bank balance is reduced and the payment is logged.
Salary Advances
To pay a salary advance, record it as an Expense with category "Salary Advance". When the actual salary is paid, deduct the advance from the salary amount manually.
💡 Deactivating an employee (not deleting) preserves their entire payment history while removing them from active payroll. Use Settings → Balances → Deactivate Employee.
Chapter 15 — GST Returns & E-Invoice
15. GST Returns & E-Invoice (IRN)
GST Returns Panel
This panel helps you prepare your monthly GST filings (GSTR-1, GSTR-3B) by summarising your sales and purchase data with GST breakdowns.
GSTR-1 — Outward supplies (your sales) — filed by the 11th of the next month
GSTR-3B — Summary return of sales and purchases with tax payable — filed by the 20th
GSTR-2B reconciliation — compares your purchase bills with your suppliers' GSTR-2B, so you claim only the input tax credit they have reported
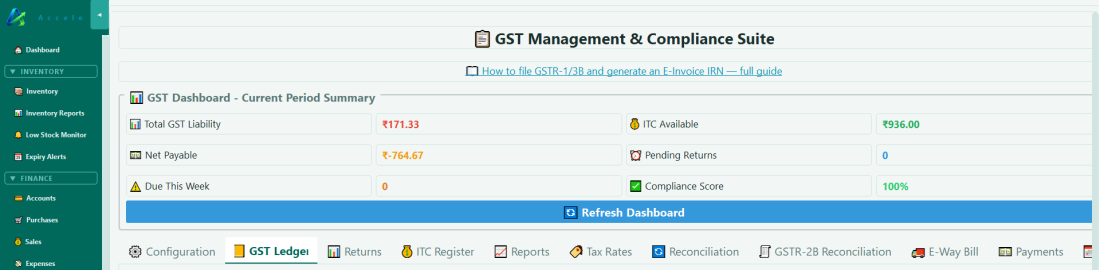
GST Management — this period's tax liability and input tax credit at the top, and tabs for the ledger, returns, GSTR-2B reconciliation, E-Way Bill and more.
Accelent calculates CGST, SGST, and IGST from the HSN codes assigned to your inventory items. Make sure all items have the correct HSN code and GST rate assigned in the Inventory panel.
Phone entries are included: sales and purchases made on the phone count in output tax, input tax credit and the GST summary, just like desktop entries. Phone entries are treated as within your own state (CGST + SGST).
HSN codes: the GSTR-1 HSN summary groups sales by each item's real HSN code. Before a GSTR-1 export, Accelent lists any sold items that have no HSN code — add them in Inventory first, then export again.
Deleted or edited bills: deleting a bill removes its tax from GST Returns, and editing a sale replaces its tax entry rather than adding a second one.
E-Invoice / IRN Panel
Businesses with annual turnover above the government threshold must generate an IRN (Invoice Reference Number) for each B2B invoice through the NIC e-Invoice portal.
1
Go to the E-Invoice panel.
2
Select an invoice from the list and click Generate IRN.
3
Accelent generates the NIC-compliant JSON file. Submit it to the e-Invoice portal to receive the IRN and QR code.
4
The IRN is saved against the invoice and printed on the invoice copy.
⚠ Consult your CA or tax consultant to confirm your e-Invoice applicability threshold and due dates. Rules change periodically.
Chapter 16 — Settings & Administration
16. Settings & Administration
The Settings panel has six tabs. Here is what each one does:
Tab
What You Can Do
🔍 Deletion Watcher
Audit trail of every record deleted in the app. You can view details, restore deleted records, or permanently remove log entries. Locked — requires admin PIN to access.
⚙️ App Settings
Recalculate all balances from transactions, backup the database, restore from a backup, set up encrypted Cloud Backup, reset the database (danger!), change language and theme.
🏢 Company
Edit company name, address, contact, GST/TIN, and logo used on invoices and reports.
👥 Users
Create staff accounts, choose what each one can see and do (🔐 Permissions), and decide who can use the phone app. The admin account is the master — keep its password safe.
🔑 License
Activate or renew your subscription, or check your trial status.
📊 Balances
Edit opening balances for cash, bank accounts, parties, customers, and employees.
🔒 Why Is the Deletion Watcher Locked?
The Deletion Watcher tab is protected by a PIN / admin authentication for a very important reason: it contains the power to restore any deleted record — invoices, purchases, expenses, inventory items, and more.
If this were open to all staff, any operator could:
Restore a deleted invoice to hide that it was removed
View the full audit trail and know they are being watched
Permanently delete log entries to erase evidence of tampering
The lock ensures that only the business owner or admin can access this sensitive area. Staff who log in as operators will never see this tab at all.
How to unlock the Deletion Watcher
1
Go to Settings → 🔍 Deletion Watcher. You will see a 🔒 lock indicator — the table and buttons are disabled.
2
Click the Authenticate button and enter your admin password.
3
The indicator changes to 🔓 Active and the full audit trail becomes visible.
4
The panel re-locks automatically when you close Settings or switch panels — keeping it secure even if you step away.
⚠ Never share your admin password with staff. The Deletion Watcher is your most powerful recovery and audit tool — it should only be accessed by the business owner.
Recalculate Balances
If you ever notice a balance looks wrong, go to Settings → App Settings → 🔄 Recalculate All Balances. This recomputes every account balance from the full transaction history and corrects any discrepancy.
User Management
You can create separate user accounts for staff (cashiers, data-entry operators, store keepers). Each staff member logs in with their own password. The admin account always has full access to everything.
🔐 Staff Permissions — What Each Staff Member Can See and Do
For each staff account you decide exactly what they can see and do. Screens they are not allowed simply disappear from their menu, and the same rules apply on the phone app.
1
Go to Settings → 👥 Users and unlock Settings with the admin password.
2
Next to a staff member, click the 🔐 button (it shows their current template, e.g. 🔐 Billing Staff).
3
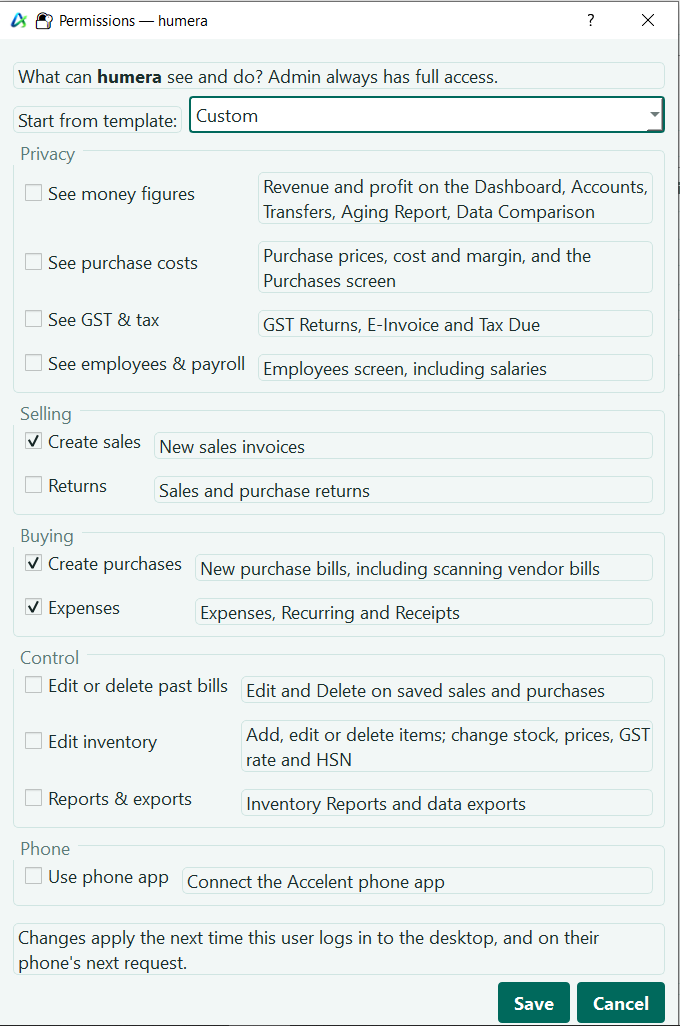
Pick a template to start from, then tick or untick any of the 12 permissions. Click Save.
The Permissions window — a starting template at the top, then the 12 permissions in groups.
Template
Typical use
Can do
Billing Staff
Counter / cashier
Create sales only — no money figures, no purchase costs
Everything except payroll and editing or deleting past bills
Manager
Trusted senior staff
Everything (phone access is set separately)
💡 New staff accounts start as Billing Staff. Give each person what they need with the 🔐 button. Changes apply the next time they log in to the desktop, and on their phone straight away.
⚠ Permissions protect your data from staff — they do not protect the admin account. Anyone who knows the admin password has full access, so keep it private.
🔑 Your Subscription
Free trial: 45 days with every feature, including 15 vendor bill scans.
Subscription: after activation, your license runs for one year. The status bar shows "Licensed until …".
Renewing: reminders start 30 days before the end date, and you can renew from Settings → 🔑 License with your renewal key. Renewing early adds the year on top of the days you have left.
If the subscription ends: bill scanning pauses at once, but saving bills keeps working for 7 more days with a countdown in the status bar. After that, saving pauses until you renew. Your data always stays viewable.
One PC per license: a license is bound to the PC it was activated on. To move to a new PC, contact support.
🚨 Never share your admin password. If an operator leaves, go to Settings → Users → select that user → click Disable. Their data entry history is preserved but they can no longer log in.
🔑 Your Account Recovery Key
The first time you set your own password — either right after installation (replacing the temporary default password) or any time afterwards — Accelent generates a unique Recovery Key for your account and shows it to you exactly once, in a box you must confirm you've saved before it closes.
💡 This key looks like a series of letter/number groups separated by dashes, e.g. 3F7A9C21-8B4E0D6F-.... Copy it to a password manager, write it on paper and keep it in a safe place, or store it in a locked note — anywhere except a file with an obvious name sitting on the same PC.
This key exists for one purpose: if you ever forget your admin password, or your account gets locked out after too many wrong attempts, the Recovery Key lets you set a brand-new password yourself, from the login screen, in under a minute — without losing any business data and without needing to contact support.
⚠ Accelent never stores your Recovery Key in readable form — only a secure hash of it, the same way passwords are protected. If you lose the key, nobody (including your software provider) can recover it for you. You would need to set a new password through other means and generate a new key.
Getting a new Recovery Key
You only ever see a given Recovery Key once. If you've misplaced it, or simply want a fresh one, you can generate a replacement any time you are logged in as admin — the previous key stops working immediately once a new one is issued.
1
Go to Settings → 👥 Users (admin account) and use the option to generate a new Recovery Key, or simply change your admin password — a new key is offered automatically whenever you don't already have one on file.
2
Save the new code exactly as described above. Tick "I have saved this recovery code somewhere safe" to close the box — it will not be shown again.
🔓 Forgot Your Password? Self-Service Recovery
If you ever forget your admin password — or the account locks itself after repeated wrong attempts — you do not need to wait for support. On the login screen, click the small "Forgot password?" link below the password field.
1
Click Forgot password? on the login screen. The Account Recovery window opens.
2
Enter your username and the Recovery Key you saved earlier (see above).
3
Enter and confirm a new password (minimum 8 characters).
4
Click Reset Password. This also clears any account lockout automatically. Log in immediately with your new password.
✅ This only resets your login password — none of your invoices, inventory, balances, or other business data are touched in any way.
🚨 If you never saved a Recovery Key and are locked out, self-service recovery is not possible — contact your software provider for assistance.
Chapter 17 — Your Data
17. Your Data — Location, Backup & Restore
Where Is Your Data?
All your data is stored in a single SQLite database file on your Windows PC:
Accelent creates an automatic backup every time it starts. Up to 10 recent backups are kept automatically.
💡 To open AppData quickly, press Windows+R, type %APPDATA%\BrandAccShay and press Enter.
Taking a Manual Backup
1
Go to Settings → ⚙️ App Settings → 💾 Backup Data.
2
Choose where to save the backup file (USB drive, Google Drive folder, or external hard disk).
3
Click Save. The backup is a single .db file containing all your data.
✅ Recommended Backup Routine:
• Daily: let Accelent auto-backup (happens automatically on startup)
• Weekly: manual backup to a USB drive or Google Drive
• Monthly: copy the entire AppData\BrandAccShay folder to an external hard disk
Restoring from a Backup
1
Go to Settings → ⚙️ App Settings → 📂 Restore Data.
2
Browse to your backup .db file.
3
Click Open. Accelent will replace the current database with the backup. The app will restart automatically.
⚠ Restoring a backup replaces ALL current data with the backup data. Any transactions entered after the backup date will be lost. Restore only when you need to recover from a serious error.
The manual backups above are saved locally — if your PC is lost, stolen, or damaged, a local-only backup may go with it. Cloud Backup solves this by encrypting a copy of your database on your own PC and saving it into a folder that syncs to your own cloud storage (OneDrive, Google Drive, Dropbox, etc.). Your software provider never sees your data — the file is encrypted before it ever leaves your computer.
Setting Up Cloud Backup
1
Go to Settings → ⚙️ App Settings → ☁️ Cloud Backup and click Set Up Cloud Backup.
2
Click Browse... and choose a folder that is synced by your cloud storage app (e.g. your OneDrive or Google Drive folder).
3
Choose a Backup Password (minimum 8 characters) and confirm it. This password encrypts every backup — remember it, and keep it separate from your admin login password.
4
Click Continue. Accelent runs the first backup and then shows a one-time Recovery Code in a box you must confirm you've saved before closing it.
⚠ The Cloud Backup password and the Cloud Backup recovery code are separate from your login Recovery Key (Chapter 16). Keep them clearly labelled apart so you don't mix them up:
Login Recovery Key — resets your app password yourself, at the login screen, no support needed.
Cloud Backup password — decrypts your cloud backup files; needed every time you restore.
Cloud Backup recovery code — only useful together with a release code from support, if you forget the Cloud Backup password.
Everyday Use
1
Click ⬆️ Backup Now any time you want an immediate encrypted backup uploaded to your cloud folder.
2
Tick Automatic daily backup to let Accelent back up your data on its own schedule without you having to remember.
Restoring from a Cloud Backup
1
Go to Settings → ⚙️ App Settings → ☁️ Cloud Backup → ⬇️ Restore from Cloud Backup.
2
Select the backup you want from the list (most recent is shown first) and enter your Backup Password.
3
Confirm the restore warning. Current data will be replaced — restart the app afterwards.
💡 Forgot your Cloud Backup password? Click "Forgot password? Use recovery code instead" in the restore window. This path requires both the recovery code you saved at setup and a release code from your software provider's support — it exists so that neither piece alone can unlock your backup.
✅ Cloud Backup is optional and separate from the automatic local backups Accelent already makes on every startup — use both for the strongest protection: local backups for quick same-PC recovery, Cloud Backup for protection if the PC itself is lost or damaged.
Moving the App to a New PC
1
On the old PC, take a manual backup (Settings → Backup Data).
2
Copy the backup .db file to a USB drive or send via Google Drive / WhatsApp.
3
Install Accelent on the new PC (Chapter 3).
4
On first launch, go to Settings → Restore Data → select the backup file from the USB drive. All your data is now on the new PC.
⚠ Your license is bound to the PC it was activated on. Before moving, contact support so your license can be moved to the new PC; then activate it from Settings → 🔑 License.
Chapter 18 — Upgrading to a New Version
18. Upgrading to a New Version
When a new version of Accelent is released, follow these steps. Your data is always safe during an upgrade because the database lives separately from the program files.
1
Take a backup first — go to Settings → Backup Data and save to a USB drive or cloud. This is a precaution, not usually needed, but always good practice.
2
Close Accelent — make sure the app is not running.
3
Download the new version — get the latest Accelent_Setup_v….exe from accelentapp.com.
4
Run the installer over your existing installation. (Using the portable zip instead? Extract it to the same folder as before and click Yes to All when asked to replace files.)
5
Open Accelent. It automatically finds your existing database at %APPDATA%\BrandAccShay\inventory.db. All your data is there, and any corrections included in the new version are applied on this first start.
6
Go to Settings → Recalculate All Balances — this ensures any database schema changes in the new version are applied correctly.
✅ You never lose data during an upgrade. The program files are in one folder; your data is in AppData. Replacing the program files does not touch your data.
💡 After upgrading, re-run setup.bat once if you use the mobile app — firewall rules may need refreshing.
Chapter 19 — Mobile App
19. Mobile App Setup & Use
Installing the App
1
Download Accelent_v1.6.6.apk from accelentapp.com on the phone, or transfer it via USB cable, WhatsApp, or Google Drive.
2
On the phone, open the file from your Downloads or Files app.
3
If prompted about unknown sources, tap Settings, enable Install unknown apps for your file manager, then go back and install.
4
Tap Install → Open.
Connecting to the Desktop
Method A — QR Code (Recommended)
1
Make sure the desktop app is running on your PC.
2
Click the 📱 Mobile Connect button (bottom-right of the desktop).
3
A QR code appears. Keep the window open.
4
On the phone, open Accelent → tap the ⚙️ icon → Scan QR Code → point camera at the desktop screen.
5
A green "Connected!" banner confirms the connection.
Method B — Manual IP
If QR scanning fails, on the phone go to Settings → type the desktop's IP address in the Desktop IP Address field → tap Test Connection → Save.
Using from Outside the Shop (Tailscale)
When you are away from the shop (mobile data or different WiFi), install Tailscale (free) on both the desktop and phone and sign in with the same account. Then scan the Tailscale QR code from the 📱 Mobile Connect dialog. You can now view and manage your business from anywhere in the world.
Mobile App Panels
📊 Dashboard
Today's sales, expenses, cash & bank balances, and recent transactions. Pull down to refresh.
🧾 Sales
Browse all invoices. Filter Paid/Unpaid. Tap + to create a new invoice from your phone.
🛒 Purchases
Browse purchase orders. Tap + to record a new purchase. Stock updates on the desktop instantly.
📦 Inventory
Search and filter all stock items. Red = out of stock. Orange = low stock.
👥 Parties
All customers and vendors with live balances. Green = they owe you. Red = you owe them.
🏦 Accounts
Live cash and bank balances with full transaction history.
Credit Purchases and Sales on the Phone
When you choose Pending on a new purchase, or Unpaid on a new sale, the phone hides the Cash / Bank / UPI buttons — nothing is paid yet. The desktop records it as credit: Credit to Vendor for a purchase, Credit to Party for a sale (with the customer's credit limit checked). It appears under that supplier or customer in Accounts, exactly like a credit entry made on the desktop.
Who Can Use the Phone App
The admin can always connect. Staff need the admin to switch their 📱 Mobile setting on in Settings → 👥 Users.
Each staff account uses one phone seat. Reinstalling the app on the same person's phone simply moves their seat — it doesn't use another one.
The phone shows only what the staff member's permissions allow; for example, without "See money figures" the dashboard shows a note instead of sales and profit figures.
Chapter 19b — Desktop–Mobile Messaging
19b. 💬 Desktop–Mobile Messaging
Accelent includes a built-in messaging system that lets the desktop owner and the mobile app user send notes to each other in real time — no WhatsApp or external app needed. Messages are stored securely in your local database.
Where Is the Messages Button?
At the very bottom of the desktop window, in the status bar, you will see a 💬 Messages button. Click it to open the chat window. The button shows an unread count badge when new messages arrive:
Button appearance
Meaning
💬 Messages
No new messages
💬 Messages (3) — highlighted in green
3 unread messages from the mobile app
Sending a Message from the Desktop
1
Click 💬 Messages in the status bar at the bottom of the screen.
2
The chat window opens. Previous messages are loaded from history.
3
Type your message in the text box at the bottom.
4
Press Enter or click Send. Your message appears on the right side (blue bubble).
5
The mobile user will see your message within 5 seconds on their phone.
Sending a Message from the Mobile App
1
On the phone, tap the 💬 Chat icon from the Dashboard or navigation menu.
2
Type your message and tap Send.
3
The desktop will receive the message within 5 seconds and show a badge on the 💬 Messages button.
Desktop Notifications (System Tray)
When the chat window is closed or minimised and a new message arrives from the mobile app, a pop-up notification appears in the Windows system tray (bottom-right corner of the screen) saying:
"📱 You have a new message from the mobile app"
Click the notification or click 💬 Messages in the app to read it.
How Messages Are Stored
All messages are saved in your local database (inventory.db) — the same file that holds all your business data. They are included in every backup. There is no external server involved — messages only travel between your desktop and phone over your own network.
💡 Common uses for messaging:
Owner is away — mobile user asks: "Customer wants 10 boxes of X, do we have stock?" — owner replies from the desktop
Desktop operator notifies mobile user: "New payment received from ABC Traders"
Quick notes between shop staff without needing personal phone numbers
⚠ The mobile app must be connected to the desktop for messages to be delivered. If the phone shows "Not Connected", messages will queue and deliver once the connection is restored.
Chapter 20 — Troubleshooting
20. Troubleshooting
Problem
Cause
Solution
App won't open / SmartScreen warning
App not digitally signed
Click "More info" → "Run anyway". This is a one-time prompt.
Balances look wrong
Data sync issue
Settings → App Settings → 🔄 Recalculate All Balances.
Stock not updating after a sale
Item not linked to inventory
Make sure inventory items are selected from the popup, not typed manually.
Invoice panel shows "Feature Under Development"
App error on first load
Close the app completely and reopen it. This is rare.
The country locks after the first sale, purchase or item
Before entering any data: Settings → App Settings → Reset Database, then pick the country again. After data exists, contact support.
Database file missing / app asks to reset
AppData folder issue
Restore from a backup: Settings → Restore Data. If no backup, contact support.
Forgot admin password / account locked
Password lost or too many failed login attempts
Click "Forgot password?" on the login screen and use your saved Recovery Key to set a new password yourself (Chapter 16). No Recovery Key saved? Contact your software provider.
Forgot Cloud Backup password
Backup password lost
In the Restore window click "Forgot password? Use recovery code instead" — requires your saved Cloud Backup recovery code plus a release code from support (Chapter 17).
App very slow on first launch
Initial Python startup
Normal — first launch takes 5–10 seconds. Subsequent launches are faster.
"Computer Date Is Wrong" message
The PC clock is behind (often a weak motherboard/CMOS battery)
Set the correct date and time in Windows, or connect to the internet once and restart Accelent. Replace the CMOS battery if it keeps happening.
"Phone limit reached" on the phone
All phone seats are in use
The message names who is connected. Remove an old phone in Mobile Connect, or upgrade your plan.
A staff member can't see a screen or button
Their permissions don't include it
Admin: Settings → 👥 Users → 🔐 next to their name → tick the permission → Save. They see it at their next login.
Bill scanning says the trial scans are used
The free trial includes 15 bill scans
Activate a license for unlimited scanning. Everything else keeps working until the trial ends.
"Subscription expired" in the status bar
The yearly subscription has ended
Renew from Settings → 🔑 License. Billing keeps working for 7 days after the end date; your data always stays viewable.
GSTR-1 export lists items without HSN
Those items have no HSN code in Inventory
Add their HSN codes in Inventory, then export again.
💡 Always try first: Close Accelent completely, wait 5 seconds, reopen it. This fixes 70% of unexpected issues.
✅ For any other issue: Take a screenshot of the error message and contact your software provider with the screenshot and a description of what you were doing when the error occurred.
Quick Reference — Daily Workflow
Task
Panel
Steps
Record a sale
Sales
Fill form → Add items → Select payment → Save Invoice